ShopDreamUp AI ArtDreamUp
Deviation Actions
What is GND filter?
GND filter or graduated neutral-density filter is the same filter like ND filter
it work like sunglasses for your camera. it reduces the light that came through it and gives you more exposure time.
it allow you to make long exposures during the day or making the city space look more dynamic by blurring the motion of the clouds.
there some kinds of ND
from weak that gives you 1-3 stops of exposure to strong blocking that gives you 10 stops
GND filter is a different from ND filter, only half of the filter is blocking the light
it uses for increase the dynamic range of the photo.
when you take landscape photo usually you get the landscape dark and the sky is OK
or the landscape is good but the sky is burn.
GND filter make it possible to keep the dynamic range in the rich of your sensor
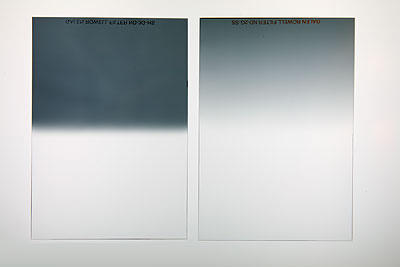
there are many different kinds of GND filters
they are different by there gradual and there strength

the GND filter prevent you from burning the sky and gives you more dynamic range
If you ask why not to use HDR?
well if it posible I prefer making GND photo
it have the same idea of hdr, it increase the dynamic range but overall if you look at the processed HDR photo you noticed that it been processed. the GND make it possible to increase the dynamic range without processing.
it also look more realistic and natural then HDR processed by a program.
the disadvantage of GND is the fact that they are expensive
and need additional equipment to attach to the camera.
so here is what I'm doing to get the same effect without buying the filter
all you need is a tripod and editing program like photoshop.
I simply doing the same thing that GND filter does in photoshop.
here 3 photos that I took for this tutorial. the same like in HDR
EV +2

EV 0

EV -2
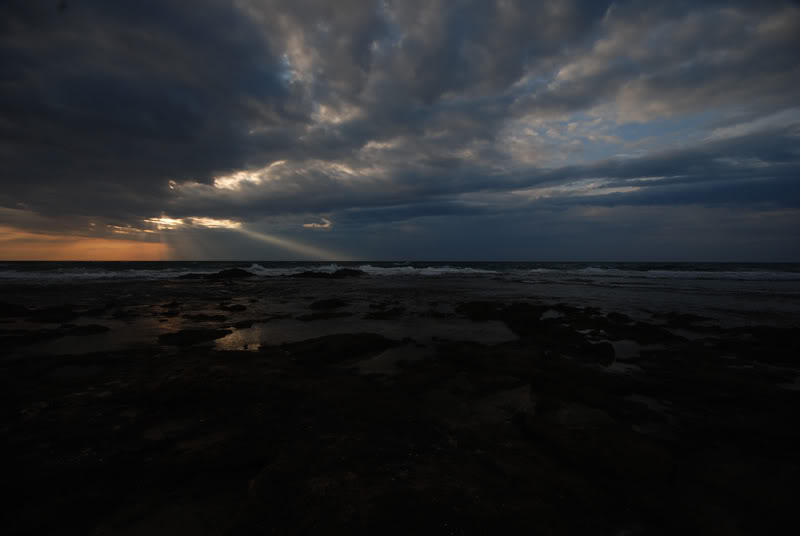
next you placing the photos in photoshop
starting with the brighter as base photo

placing the middle photo on top of the base photo

create a mask for the middle exposure

use gradient (G) to create a mask (the place where I place the mask is marked by the red arrow)
the Idea of using gradient is the same idea of GND filter

place the dark exposure on the top
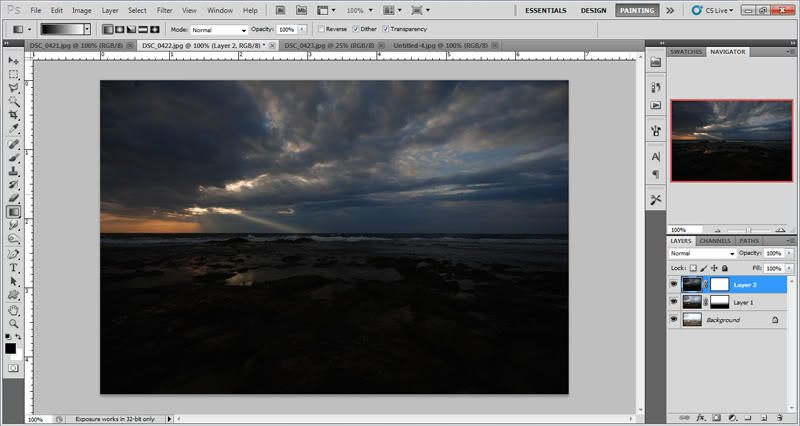
and use use gradient to expose the part you need

that the result

after some level fix and sharpen

here is the same photo that have been processed in HDR program

which photo look more realistic?
there some disadvantage for this technique
it work well only in level horizontal like waterscape
if you have mountain landscape or cityscape it will be harder to create the mask (most of the time you need to make it manual with the brush or fixing it after the gradient)
also if you have moving objects like waves or cars it impotent to pay attention that they are not in the gradient zone
if they are it possible that they transparent.
hope that this tutorial was useful for you
if you have something to say or advice (also spelling mistakes) you will be welcome
GND filter or graduated neutral-density filter is the same filter like ND filter
it work like sunglasses for your camera. it reduces the light that came through it and gives you more exposure time.
it allow you to make long exposures during the day or making the city space look more dynamic by blurring the motion of the clouds.
there some kinds of ND
from weak that gives you 1-3 stops of exposure to strong blocking that gives you 10 stops
GND filter is a different from ND filter, only half of the filter is blocking the light
it uses for increase the dynamic range of the photo.
when you take landscape photo usually you get the landscape dark and the sky is OK
or the landscape is good but the sky is burn.
GND filter make it possible to keep the dynamic range in the rich of your sensor

there are many different kinds of GND filters
they are different by there gradual and there strength

the GND filter prevent you from burning the sky and gives you more dynamic range
If you ask why not to use HDR?
well if it posible I prefer making GND photo
it have the same idea of hdr, it increase the dynamic range but overall if you look at the processed HDR photo you noticed that it been processed. the GND make it possible to increase the dynamic range without processing.
it also look more realistic and natural then HDR processed by a program.
the disadvantage of GND is the fact that they are expensive
and need additional equipment to attach to the camera.
so here is what I'm doing to get the same effect without buying the filter
all you need is a tripod and editing program like photoshop.
I simply doing the same thing that GND filter does in photoshop.
here 3 photos that I took for this tutorial. the same like in HDR
EV +2

EV 0

EV -2

next you placing the photos in photoshop
starting with the brighter as base photo

placing the middle photo on top of the base photo

create a mask for the middle exposure

use gradient (G) to create a mask (the place where I place the mask is marked by the red arrow)
the Idea of using gradient is the same idea of GND filter

place the dark exposure on the top

and use use gradient to expose the part you need

that the result

after some level fix and sharpen

here is the same photo that have been processed in HDR program

which photo look more realistic?
there some disadvantage for this technique
it work well only in level horizontal like waterscape
if you have mountain landscape or cityscape it will be harder to create the mask (most of the time you need to make it manual with the brush or fixing it after the gradient)
also if you have moving objects like waves or cars it impotent to pay attention that they are not in the gradient zone
if they are it possible that they transparent.
hope that this tutorial was useful for you
if you have something to say or advice (also spelling mistakes) you will be welcome
Tutorial: Revers lens
I always wanted take macro photos but couldn't afford an expensive macro lens. I have a professional camera but why should I use it when my smartphone can take better macro then my expensive Mirroless or SLR camera? So here is a tutorial that show you how can you take macro photos without going bankrupt. Revers lens, probably you heard about this in some point in your life. I found it back in 2010 and found that I can get very dissent photos out of it. This doesn't require very much from you So what you need? simply, a camera and a good cheap lens like 50mm 1.8 (bigger aperture is better) for the basic revers lens I'm using two lenses for this technique and I will explain why later on this tutorial so this is my setup I using Pentax K7D that cost me 200$ back then from a second hand the lens that I using is Pentax 85mm f/2.0 and and 55m f/1.8 manual focus that each one of them cost me 25$ (I found that Pentax giving you very good lens for very cheap price and also the camera
Modifying Russian lens for Nikon (Industar 50-2)
Yesterday I finally got M42 mount ring adapter for Nikon
the first lens I tried to put on the camera was the Helios 44-2, after I attached it on the camera I found that it have infinity focus problem so I have to modify the lens so it can go to infinity.
so today I took other old Russian lens that I own
the lens is Industar 50-2, standard 50mm f/3.5, probably on of the cheapest lens that been produced during the soviet time
you can get it from eBay for 20$
it came as a kit lens on Zenit-E
originally this lens designed for rangefinder cameras like Zorki or Kiev during the 50's
during it evolution it have been modify for Russian SLR
Modifying Russian lens for Nikon (Helios 44-2)
as most of you may know, in this days it not so hard and expensive to get an old Russian film camera like Zorki or Zenit
for example because my family and me originally came from USSR we have a lot of old Russian cameras at home
also many Russians immigrate to Israel and to the rest of the world during the 90's so it very easy to find second hand old camera.
so what good about old Russian cameras and lenses?
in my opinion the biggest advantage of russian cameras and lens is that most of them have been replicated from German cameras like Leica. also some of the lens have been replicated.
this cameras and lens have been mass produced and
Think Outside the Box: Scanography
not so long ago I bought a new A3 printer with scanner for my studies so I be able to print plans on A3 without going out from my apartment.
today I set it and check it and It prints very well
the next step was to check the scanner, it more practical then scanning with camera, you don't have to edit it after you take the photo of the scanned object. the printer did a quite good hob at scanning on of my sketches.
and then I thought that principally it doing the same job as a camera that aimed straight to the object.
could it work as a camera? could it be an artistic tool.
soon I went on the internet and I found my answer very fast.
well,
© 2014 - 2024 FX-1988
Comments2
Join the community to add your comment. Already a deviant? Log In
I agree. You can clearly see the unnatural shadowing on the rocks in the HDR image. Too many people use HDR as a blanket fix for the entire photo. The result is an image that looks gritty, and (ironically) contrasty. Your result just looks nice and does not draw attention to the composited effect.
